

The Best Tools for Simulating Natural Light in Color Design
Accurately simulating natural light is a critical bridge between design intent and real-world perception. It allows you to visualize how colors, materials, and surfaces will behave under the dynamic conditions of daylight, enabling precise color evaluation, energy-efficient planning, and compelling visual presentations.
The right tool depends entirely on the stage of your workflow and whether your goal is scientific measurement, architectural planning, or visual storytelling.
- For Color Science & Manufacturing: Use calibrated spectrophotometers with UV control and physical light booths for objective, lab-standard color evaluation under simulated daylight conditions.
- For Architectural & Interior Design: Utilize advanced lighting design software that combines calculation engines with photorealistic rendering to simulate sun position, sky conditions, and light-material interactions.
- For Visual Media & Previsualization: Leverage 3D rendering and previsualization software with physically accurate sun and sky systems to plan and create realistic images and animations.
The Core Objective: Predicting Real-World Color Behavior
Natural light is not a static, uniform source. It changes in color temperature, intensity, and angle throughout the day and across seasons, dramatically affecting how we perceive color. A paint swatch, a fabric sample, or a digital interface can look profoundly different in morning sun versus evening shade. The purpose of simulation is to remove this uncertainty.
For product manufacturers, this means ensuring a plastic part produced in one factory matches the color standard set in another, regardless of local lighting. For architects, it means predicting glare, optimizing window placement for wellbeing, and ensuring a material palette works harmoniously at all times of day.
For visual creatives, it means crafting believable, emotionally resonant images by controlling light and shadow with real-world accuracy. Effective simulation provides a controlled environment to make confident, data-backed decisions before committing to physical production or construction.
A Framework of Specialized Tools by Design Phase
Natural light simulation tools fall into three distinct categories, each serving a specific phase of the design and production process.
1. Measurement & Calibration Tools: For Objective Color Science
This category is about quantifying color under standardized conditions, not creating visuals. It is foundational for industries where precise color matching is non-negotiable, such as textiles, automotive paints, plastics, and printing.
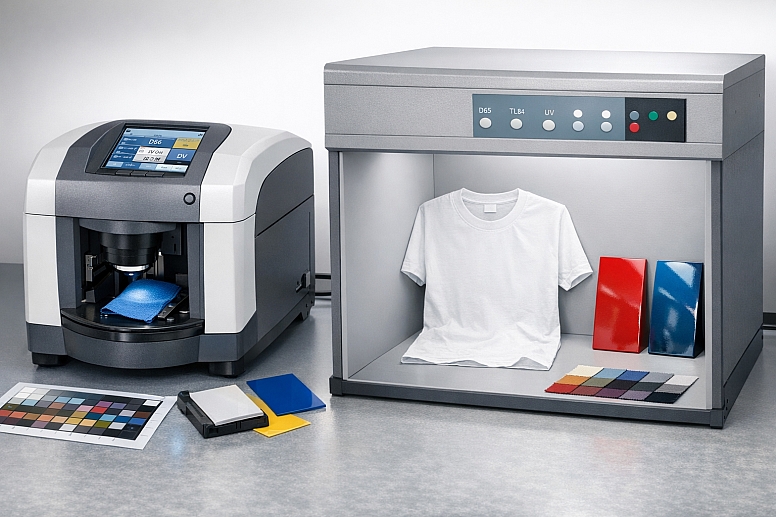
- Spectrophotometers with UV Control: These are laboratory instruments that measure colour by illuminating a sample with a calibrated light source and analysing the reflected light. Advanced models feature UV control, which is crucial for simulating daylight. They can mimic the CIE standard illuminant D65—a technical definition of average daylight—and account for Fluorescent Whitening Agents (FWAs) commonly used in paper and fabrics, which glow under UV light. This allows a designer in a lab to see exactly how a "bright white" t-shirt will look in outdoor sunlight.
- Physical Light Booths: These are standardized viewing cabinets containing multiple light sources, including simulated daylight (D65). They provide a consistent, neutral environment for visual color assessment and comparison, eliminating the subjectivity of evaluating colors under office lighting or next to a window. Professionals use them to perform "metamerism" tests, where two samples match under one light source (like store LED lighting) but not under another (like daylight), preventing costly mismatches in final products.
2. Architectural Simulation & Analysis Software: For Built Environment Design
This software is used to calculate, analyze, and visualize light within architectural spaces. It combines powerful calculation engines with rendering capabilities to inform both technical performance and aesthetic outcomes.
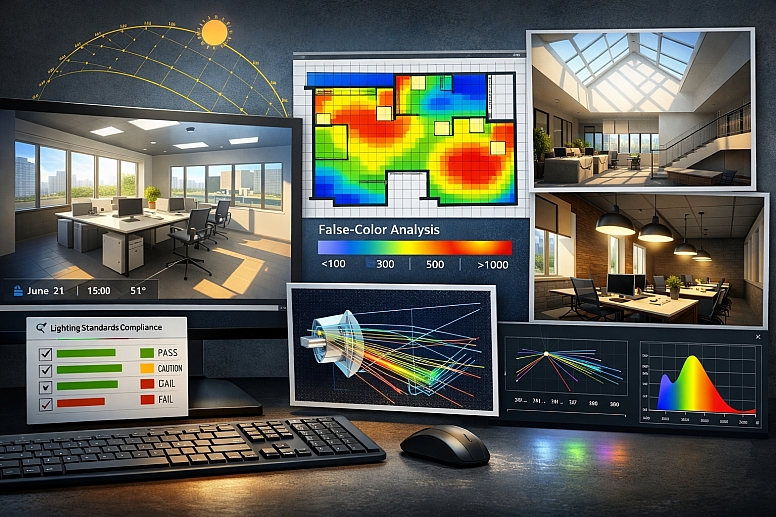
Specialized Lighting Design Software: Tools like DIALux evo and VELUX Daylight Visualizer are built for this purpose. They allow designers to import 3D building models, specify geographic location, and then simulate the sun's path at any date and time. Key features include:
-
- False-Color Analysis: Generating illuminance or luminance maps that visually code light levels across a floor plan or surface, making it easy to identify under-lit or over-lit areas.
- Photorealistic Rendering: Using ray-tracing to create realistic images that show the interplay of light, shadow, and materials.
- Compliance Reporting: Automatically checking designs against industry lighting standards for wellbeing, safety, and energy efficiency.
Advanced Optical Simulation: For highly technical applications—like designing the optical system for a skylight, a light fixture, or analyzing complex material interactions—software like TracePro is used. It employs precise ray-tracing algorithms to model how light propagates, reflects, and transmits through materials, providing deep insight into luminance, glare, and efficiency.
3. 3D Rendering & Previsualization Software: For Visual Storytelling
This category is for creating compelling imagery and animations where natural light is a key artistic component. It's used by photographers, cinematographers, and visual artists to plan shoots and by architects for high-end client presentations.
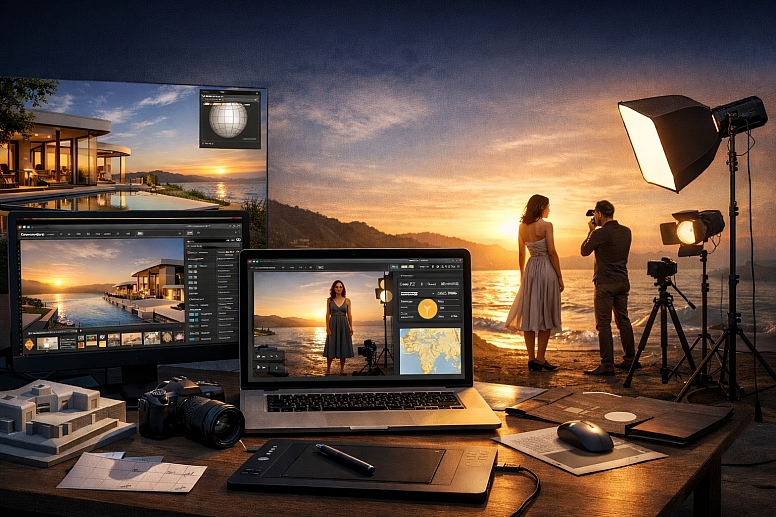
- General 3D & Rendering Suites: Software like Blender, Cinema 4D, and Autodesk Maya have robust lighting systems. They use HDRI (High Dynamic Range Image) environment maps to surround a 3D scene with a 360-degree image of real-world lighting, creating incredibly natural reflections and ambient light.
- Dedicated Previsualization Tools: Applications like set.a.light 3D are tailored for photographers and videographers. They feature a library of real-world camera and lighting equipment and, importantly, a dynamic sun and sky system. This allows users to set a specific location, date, and time to position the sun accurately, plan shots around the "golden hour," and see how artificial fill lights interact with the sun in real-time.
Comparative Analysis of Tool Categories
| Tool Category | Primary Function | Key Output | Best For | Example Tools |
|---|---|---|---|---|
| Measurement & Calibration | Objective color measurement under standardized, simulated daylight. | Numerical color data (Lab values), pass/fail against a standard. | Quality control, material specification, supply chain color matching. | HunterLab Spectrophotometers, Datacolor Light Booths |
| Architectural Simulation | Technical analysis and visualization of daylight performance in built spaces. | Illuminance maps, glare analysis, photorealistic renders, compliance reports. | Architectural design, lighting planning, sustainability (LEED/BREEAM), wellbeing. | DIALux evo, VELUX Daylight Visualizer, AGi32 |
| 3D & Previsualization | Creating photorealistic images and animations with accurate natural lighting. | High-resolution renders, animations, virtual shoot plans. | Architectural visualization, photography/cinematography planning, product viz, marketing. | Blender, set.a.light 3D, Cinema 4D |
Strategic Implementation in the Design Workflow
Integrating these tools effectively requires aligning them with your project stages.
Phase 1: Foundation & Ideation
- Action: Establish your core color palette or material selections.
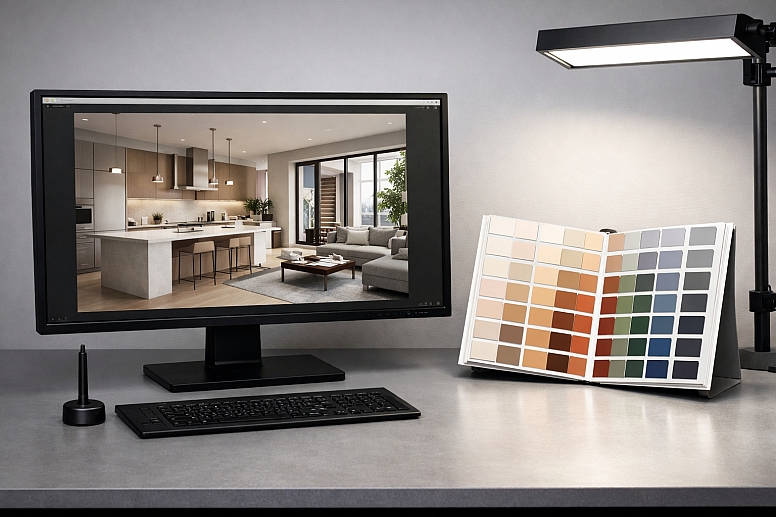
- Tool Use: Evaluate physical samples or digital color values in a calibrated light booth under the D65 (daylight) setting. This ensures your foundational choices are based on their true, neutral appearance.
Phase 2: Development & Integration
- Action: See how colors and materials work together in a specific spatial context.
- Tool Use: For interior or product design, use rendering software (like Blender or Keyshot) with accurate material definitions and HDRI lighting to create realistic mockups. For architecture, use lighting design software (like DIALux) to model the space and run seasonal daylight studies.
Phase 3: Validation & Specification
- Action: Ensure technical performance and compliance.
- Tool Use: Run detailed false-color analysis in software like VELUX Daylight Visualizer to confirm light levels meet standards like EN 17037. For manufactured products, use spectrophotometer data to create a Digital Quality Management (DQM) color standard for suppliers.
Phase 4: Communication & Presentation
- Action: Convince clients, stakeholders, or your audience.
- Tool Use: Generate photorealistic renderings or animations that tell the story. Show a space transitioning from dawn to dusk, or a product in a beautifully lit environment. Tools like set.a.light 3D allow you to plan and present these visual narratives with confidence. Read more about color in visual storytelling.
Common Pitfalls and Misconceptions
Misconception: "My calibrated computer monitor shows true colors, so that's enough." Monitor calibration ensures color accuracy on your screen but does not simulate how those colors will be perceived under different, real-world lighting conditions. A logo that looks perfect on your monitor may look washed out in direct sunlight. Simulation tools model the effect of light on the object, which is a separate challenge.
Pitfall: Relying solely on visual renders without analytical data. A render may look beautiful but hide serious problems like excessive glare on a computer screen or insufficient light on a staircase. Always pair aesthetic visualization with the analytical data (illuminance levels, uniformity ratios) provided by professional lighting design software.
Misconception: "Daylight simulation is only for architects." Any designer whose work will be viewed in natural light benefits from simulation. A UX/UI designer should check app contrast in sunlight; a packaging designer must ensure their colors hold up on a store shelf near a window; a fashion designer needs to see how fabric dyes interact with daylight.
Pitfall: Ignoring geographic location and time of year. The sun's angle in Oslo in December is completely different from its angle in Dubai in June. High-quality simulation tools allow you to set these parameters. Failing to do so renders the simulation generic and potentially misleading for site-specific projects.
A Method for Selecting and Applying Simulation Tools
- Define the Core Question. What are you trying to learn or prove? ("Does this paint color make the north-facing room feel cold?" "Will this product's red fade unevenly in sunlight?" "Is there enough light to read here at 4 PM in winter?")
- Identify the Required Fidelity. Do you need a precise numerical measurement (use a spectrophotometer), a technical performance metric (use lighting analysis software), or a high-fidelity visual (use rendering software)?
- Gather Accurate Inputs. The principle of "garbage in, garbage out" is paramount. You need:
- Geographic Data: Location, orientation, time/date.
- Material Data: Accurate reflectance (RGB/albedo) values, transparency, texture.
- Geometric Data: A correct 3D model of the space or object.
- Run Focused Simulations. Don't simulate everything at once. Isolate variables: test the summer solstice vs. the winter solstice; test the material with and without a specific coating.
- Analyze and Iterate. Use the tool's outputs—whether data plots, false-color maps, or renders—to make informed decisions. Adjust materials, geometry, or aperture sizes and re-simulate.
- Document and Communicate. Use the outputs (compliance reports, comparison renders, color measurement certificates) as evidence to support your design decisions to engineers, clients, or production teams.
Questions on Simulating Natural Light
What is the "D65" standard I keep seeing? CIE Illuminant D65 is a standardized mathematical model of the spectral power distribution (the "color") of average daylight with a correlated color temperature of 6500 Kelvin. It is the international benchmark for "daylight" used in color science, manufacturing, and simulation to ensure everyone is evaluating colors under the same consistent conditions.
Can I get accurate results with free software? Yes, to a degree. Blender is a powerful, free 3D suite with excellent lighting capabilities. DIALux evo and VELUX Daylight Visualizer are free, industry-standard tools for lighting design and daylight analysis, respectively. They require time to learn but offer professional-grade simulation. Free tools may lack the advanced automation or specialized material libraries of high-end paid software.
How do these tools handle the changing color of light throughout the day? Advanced tools simulate this in two ways: 1) By allowing you to set a specific solar position (altitude and azimuth), which inherently changes the light's color temperature (cool blue overhead at noon, warm red at low angles). 2) By using time-animated HDRI sky maps that capture the full dynamic range and color shift of a real sky over time.
What's the difference between illuminance and luminance in simulations? This is a crucial distinction.
- Illuminance (measured in lux) is the amount of light falling on a surface (e.g., is there enough light on this desk?).
- Luminance (measured in candela per square meter) is the amount of light emitted or reflected from a surface (e.g., how bright does this wall or screen appear?).
Good simulation software calculates and visualizes both, as they address different aspects of visual comfort and perception.
LEAVE A COMMENT
Recent Posts


0.0454